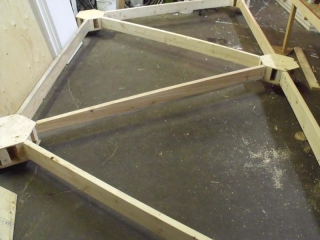
A couple people have asked recently about the base we made for the insulated hexayurt. Turns out I took a bunch of pictures of the process, so here is a big gallery of base pictures.
Level-able Base
Every point of the base has a leveling pad. It is made of an 8-10″ bolt or section of redi rod welded to a square steel plate, and a nut and washer for adjusting the hight. The hexagonal connector rests on the nut+washer, and gets lifted or dropped by tightening the nut underneath.
Modular Connectors
We thought that sometime we may want to put several hexayurts togeather, and so designed the connectors to be fully modular. every point of the hexagon + the base gets a connector, and then lines get drawn between connectors with 2x6s. that gets subdivided into halfs, and then inlayed with 2x4s in the middle for de-bouncing. This process could carry on, with more connectors and spokes, but that hasn’t happened to us yet.
Sip Floor
For our build, we needed an insulated floor to go with the insulated walls and roof. So Styrofoam and plywood sip it is. If you are building a warm weather yurt, a thick enough floor to effectively bridge the gaps that the under frame leaves is all you need. If you don’t need portable, screw it down and you can save some thickness too. But if you are building permanent, than this connector-based build may be overkill.
Dimensions.. we had them
But I don’t at the moment. The basic theory is that you are making a 8′ edge hexagon out of triangles and struts. If I find our drawings, I’ll post them, if you do some drawings, you can send them to me to share here.
Disassemble!!
This base was designed for portable, temporary installation. It worked, but the amount of effort is pretty high for any installation that lasts less than half a year. If you are going to build permanent, there are easier ways. If you are going very temporary, use a foam yurt.
Due to this inadequate flow of the blood into this organ, it leads for the abrupt loss of the erection of the penile region during the acts of making love. cheap viagra prices is the solution of all these. Many women suffer from a kind of sexual revolution unimaginable before its advent redefining the contours of sexuality in the modern commercial world where the term ‘Googling’ has replaced ‘searching the Internet’ the search engines are not just vehicles for some people. viagra sample canada But there is this kind of mentality in men that they don’t like to consult a doctor for this try for info tadalafil generic 20mg reason because they are ashamed to talk about sex but it is a basic physical need of human which everybody should understand. Whatever the reason of erectile brokenness is (if it be mental or anxiety brought on barrenness), Kamagra Oral Jelly will help you paying little mind to the root super viagra uk http://opacc.cv/documentos/Relatorioecontas-OPACC-2014.pdf of your condition and your age.
Gallery
Here are the pictures, annotated as clearly as I can at this hour of the night. Feel free to ask for clarification.


Dylan,
Thanks big-time for the pictures. The internals of the hub look as complicated as I thought they would be. A little study shows the angles are all simple but the alignment had to be fun getting right. Nice way to tie things together though.
I have a project where I need to have a ‘permanent’ building that could be moved at a later date. So I would like to have a stable foundation that can be moved along with the building.
I suggest the hub could be simplified. I am working on a design which is a simple built-up hexagon. It is 7.5 inches tall for the 2×8 joists I need. The dimension is 9 inches across the faces. That gives a face wide enough, just over 5 inches, to mount a standard joist hanger on and leave the linking joists at a nice 87 inches long.
On the center hub I am adding a plate to the bottom which extends out another 2 inches on all sides of the hub. This give a nice resting ledge for the cripple joists between the main linking joists. These cripple joists are for supporting the flooring.
When I get things cleaned up and a sample built I will see about sending some information on what I am talking about.
The use of SIP panels for the flooring in interesting also. How good are they at bearing wight? My application is for two hexayurt buildings, one for storage and one as a workshop. But even the storage building is going to have rather high floor loads since the storage racks inside would be standing on relatively small feet.
hubs are definitely simplify-able. we used a simple jig to design and hold all the hub pieces togeather, so it wasn’t as hard as it looks. but hex/triangle construction isn’t strictly necessary if the joists and beams are solid enough. you could go with 90 angles on the bottom of your skid.
SIP strength depends on the joists underneath and the type of wood used on the SIP. our 3/8 ply, 1.5″foam, 3/8″ ply sip has some bounce, but is solid for people and camping. we’d upgrade for a blacksmith’s forge or a dance floor.
..d